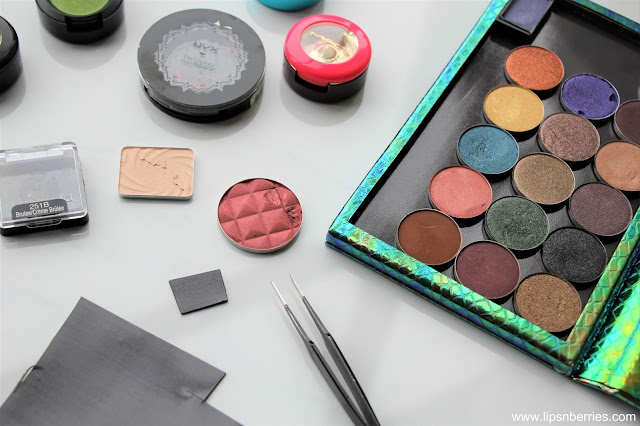
Do you travel with your makeup? Isn't it annoying when you have to carry a million single eyeshadows? Your favorite ones, that you can't do your makeup without. You can't find a similar shade in any of your eyeshadow palette so have to lug them from one place to another.. forever trying to locate them in your seemingly bottomless makeup bag. I do! and this year I've decided to tackle this problem. I bought a Z palette dupe from Wish App for about $15 NZD coz you know how expensive those real Z palettes are. A large Z palette is $32 USD and ABH Modern Renaissance palette is $42 USD, on Beautylish so go figure! I'd rather buy a full new eyeshadow palette with that kinda money. My Z palette dupe is a beauty nevertheless. Its thick n sturdy, has a magnetic sheet inside it, is see through from top and has a beautiful chrome mermaid scales look. Nothing I can complain about. I just wish it was a little bigger because I have a lot more single eyeshadows I want to put in there. As per my guesstimate, my palette could take 18+ single eyeshadows depending on their size, which is actually more than most eyeshadow palettes of today's time.
Use can use my code 'jrqdxvg' for 50% off your first order with Wish. Click here to see the palette I bought.
As soon as it arrived, I shifted all my Anastasia Beverly Single Eyeshadows in there. I'm sure the pans were equally delighted because they graduated from a makeshift CD case storage (which I'm still quite proud of to be honest, served me for more than an year at no cost) to a very flash looking actual palette looking palette.
Then I started the task of depotting some of my favorite eyeshadows- A few from MAC (from various collections over the years), a shimmery pink NYX one which is my go to for Indian weddings and a neutral matte from Wet n Wild that is my most sought after for layering over primer before I start any eye look.
This exercise has made me appreciate the value of single eyeshadow pans and I vowed to only ever buy eyeshadows in pans and not their fancy packaging. It's so hassle-free and satisfying to stuck them into your custom palette instantly.
Here's an easy step by step tutorial on how I depotted my MAC eyeshadows. Exact same procedure was followed for NYX and Wet n Wild eyeshadows.
Things you'll need- Eyeshadows to depot, Z palette or likes, butter knife (I used my honey wax spatula), a pair of tweezers, a hair straightener, piece of baking paper to coat straightener so you don't damage that expensive appliance for the sake of some eyeshadow depotting. That won't be an economically viable undertaking. Isn't it?
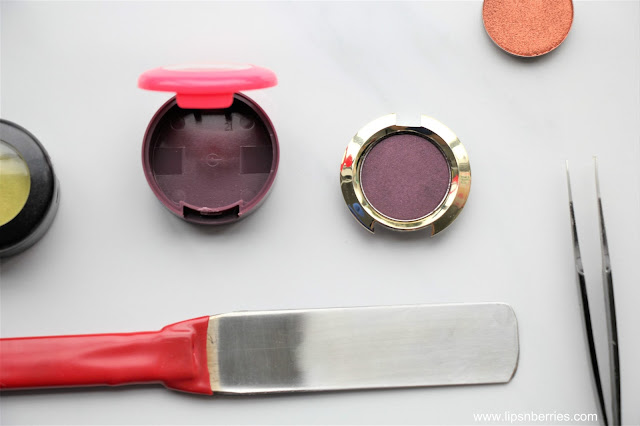
Step 1- Separate the (eyeshadow pan insert + plastic container its glued in) from the main body of eyeshadow packaging. Use your spatula for this. There's a tiny gap between these two, where you have to force your spatula in and flick it upwards. Take care at this point because there's every possibility that the eyeshadow pan will fly out and land somewhere it shouldn't. We all know how messy that can be. So go slow and place a finger tip over it ever so gently to avoid the said flying eyeshadow scenario.
It'll come out/off with a click.
Step 2- You'll be left with plastic container and an actual metallic eyeshadow pan glued in it.
Step 3- Turn on your straightener and put some baking paper over it. I put my straightener on its side, on a tile so I don't burn myself or my carpet. I even used a heat protectant mat underneath to save my tile.
Put the above mentioned eyeshadow pan on straightener plate for a few seconds.
In this process the back side of container, which is plastic, will melt slightly and the glue inside it will loosen. Warning- Its HOT! USE TWEEZERS TO HOLD IT.
Step 4- As the plastic part is slightly melted and flexible now, using tweezers push the eyeshadow pan out by sticking tweezers in the bottom middle . The metallic pan should pop right out. IT IS VERY HOT!
Step 5- You can assemble your eyeshadow again so you can use it for 'Back to MAC'.
Step 6- You can also take the sticker from original packaging and stick it under your new eyeshadow pan (optional).
Step 7- Put your eyeshadow pan into Z palette or its dupe (whateva!). Done.
Similar procedure was followed for Wet n Wild and NYX single eyeshadows. For Wet n Wild I found that the pans were not magnetic, so I cut a piece of magnetic sheet (available from craft stores) and stuck it under that eyeshadow and all was fine in the world again.
Here I'm just showing off the end result and how I will be travelling in future with just these two palettes. I got all my eyeshadow needs covered in my custom eyeshadow palette and the iconic Modern Renaissance palette from ABH.
I'm super proud of this DIY. If you try it, let me know. If you have any specific questions from the tutorial, let me know in the comments below and I'll try my very best to help.
Just for today, I've posted Instagram stories (with videos) for this whole procedure. It's available for next 24 hours, if you are keen to view it. It's so easy. My Instagram handle is lipsnberries.
Talk soon xx
Stay Rad
Nishu


Post a Comment